//스케치는 프로그램 저장 공간 25636 바이트(83%)를 사용. 최대 30720 바이트.
//전역 변수는 동적 메모리 2410바이트(117%)를 사용, -362바이트의 지역변수가 남음. 최대는 2048 바이트.
#include <DHT.h>
#include <Adafruit_NeoPixel.h>
#include <U8g2lib.h>
#include <PMS.h>
#include <SoftwareSerial.h>
#include <IRremote.h>
#include <SPI.h>
#include <MFRC522.h>
#define NEO_PIN 6
#define DHT_PIN 2
#define IRrecvPin 5 // An IR detector/demodulator is connected to GPIO pin 5
#define cdsPin A6
#define buttonPin A3 // select the input pin for the potentiometer
#define RST_PIN 9 // Configurable, see typical pin layout above
#define SS_PIN 10 // Configurable, see typical pin layout above
SoftwareSerial pmsSerial(7, 4); //RX, TX
PMS pms(pmsSerial);
PMS::DATA data;
byte pm25_status = 0;
byte pm100_status = 0;
U8G2_SSD1306_128X64_NONAME_1_HW_I2C u8g2(U8G2_R0);
Adafruit_NeoPixel neoPixel = Adafruit_NeoPixel(2, NEO_PIN, NEO_GRB + NEO_KHZ800);
const int neo_color[][3] = {{32, 32,32}, {0, 0, 32}, {0, 32, 0}, {32, 21, 0}, {32, 0, 0}, {16, 0, 0}, {0, 8, 0}};
byte neo_color_index=0;
DHT dht(DHT_PIN, DHT22);
float temp;
float humi;
char IRDisplayStr;
char RFIDDisplayStr;
MFRC522 mfrc522(SS_PIN, RST_PIN); // Create MFRC522 instance.
byte buffer[18];
byte block;
byte waarde[64][16];
MFRC522::StatusCode status;
MFRC522::MIFARE_Key key;
// Number of known default keys (hard-coded)
// NOTE: Synchronize the NR_KNOWN_KEYS define with the defaultKeys[] array
#define NR_KNOWN_KEYS 8
// Known keys, see: https://code.google.com/p/mfcuk/wiki/MifareClassicDefaultKeys
byte knownKeys[NR_KNOWN_KEYS][MFRC522::MF_KEY_SIZE] = {
{0xff, 0xff, 0xff, 0xff, 0xff, 0xff}, // FF FF FF FF FF FF = factory default
{0xa0, 0xa1, 0xa2, 0xa3, 0xa4, 0xa5}, // A0 A1 A2 A3 A4 A5
{0xb0, 0xb1, 0xb2, 0xb3, 0xb4, 0xb5}, // B0 B1 B2 B3 B4 B5
{0x4d, 0x3a, 0x99, 0xc3, 0x51, 0xdd}, // 4D 3A 99 C3 51 DD
{0x1a, 0x98, 0x2c, 0x7e, 0x45, 0x9a}, // 1A 98 2C 7E 45 9A
{0xd3, 0xf7, 0xd3, 0xf7, 0xd3, 0xf7}, // D3 F7 D3 F7 D3 F7
{0xaa, 0xbb, 0xcc, 0xdd, 0xee, 0xff}, // AA BB CC DD EE FF
{0x00, 0x00, 0x00, 0x00, 0x00, 0x00} // 00 00 00 00 00 00
};
byte newUid[10] = {0xDE, 0xAD, 0xBE, 0xEF};
bool IsRfidWriteMode = false;
// ==================== start of IRrecv config ====================
IRrecv irrecv(IRrecvPin);
decode_results results;
byte size_of_rawdata;
uint16_t *raw_data;
// ==================== end of of IRrecv config ====================
// ==================== start of IRsend config ====================
IRsend irsend; // An IR LED must be connected to Arduino PWM pin 3.
bool IRLED_SEND_SWITCH = false;
bool CLEAR_TO_SEND = false;
// ==================== end of of IRsend config ====================
//==================== start setup ====================
// This section of code runs only once at start-up.
void setup() {
pinMode(cdsPin, INPUT);
pinMode(buttonPin, INPUT);
Serial.begin(9600);
pmsSerial.begin(9600);
dht.begin();
u8g2.begin();
u8g2.enableUTF8Print();
neoPixel.begin();
neoPixel.show();
irrecv.enableIRIn();
SPI.begin(); // Init SPI bus
mfrc522.PCD_Init(); // Init MFRC522 card
}
//==================== end setup ====================
//==================== start rfid func ====================
bool check_status_failed(MFRC522::StatusCode ck_status){
if (ck_status != MFRC522::STATUS_OK) {
Serial.print(F("failed: "));
Serial.println(mfrc522.GetStatusCodeName(status));
return true;
}
return false;
}
void rc522_epil(){
mfrc522.PICC_HaltA(); // Halt PICC
mfrc522.PCD_StopCrypto1(); // Stop encryption on PCD
}
bool try_key(MFRC522::MIFARE_Key *key)
{
bool result = false;
for(byte block = 0; block < 64; block++){
// Serial.println(F("Authenticating using key A..."));
status = mfrc522.PCD_Authenticate(MFRC522::PICC_CMD_MF_AUTH_KEY_A, block, key, &(mfrc522.uid));
if (check_status_failed(status)) {
return false;
}
// Read block
byte byteCount = sizeof(buffer);
status = mfrc522.MIFARE_Read(block, buffer, &byteCount);
if (!check_status_failed(status)) {
// Successful read
result = true;
//dump_uid
for (byte i = 0; i < mfrc522.uid.size; i++) {
newUid[i] = mfrc522.uid.uidByte[i];
}
// Dump block data
for (byte p = 0; p < 16; p++)
{
waarde [block][p] = buffer[p];
}
}
}
rc522_epil();
return result;
}
void rfid_rw(bool w_mode) {
// Look for new cards
if ( ! mfrc522.PICC_IsNewCardPresent() || ! mfrc522.PICC_ReadCardSerial() ) {
return;
}
if(!w_mode)
{
// Try the known default keys
MFRC522::MIFARE_Key key;
for (byte k = 0; k < NR_KNOWN_KEYS; k++) {
// Copy the known key into the MIFARE_Key structure
for (byte i = 0; i < MFRC522::MF_KEY_SIZE; i++) {
key.keyByte[i] = knownKeys[k][i];
}
// Try the key
if (try_key(&key)) {
// Found and reported on the key and block,
// no need to try other keys for this PICC
break;
}
}
}
else
{
for (byte i = 0; i < 6; i++) {
key.keyByte[i] = 0xFF;
}
for(byte i = 4; i <= 62; i++){
if(i == 7 || i == 11 || i == 15 || i == 19 || i == 23 || i == 27 || i == 31 || i == 35 || i == 39 || i == 43 || i == 47 || i == 51 || i == 55 || i == 59){
i++;
}
block = i;
// Authenticate using key A
status = (MFRC522::StatusCode) mfrc522.PCD_Authenticate(MFRC522::PICC_CMD_MF_AUTH_KEY_A, block, &key, &(mfrc522.uid));
if (check_status_failed(status)) {
return;
}
// Authenticate using key B
status = (MFRC522::StatusCode) mfrc522.PCD_Authenticate(MFRC522::PICC_CMD_MF_AUTH_KEY_B, block, &key, &(mfrc522.uid));
if (check_status_failed(status)) {
return;
}
/*
// Set new UID
if ( mfrc522.MIFARE_SetUid(newUid, (byte)4, true) ) {
Serial.println(F("Wrote new UID to card."));
}
*/
// Write data to the block
status = (MFRC522::StatusCode) mfrc522.MIFARE_Write(block, waarde[block], 16);
check_status_failed(status);
}
rc522_epil();
}
}
//==================== end rifd func ====================
//==================== start loop func ====================
void loop() {
if (irrecv.decode(&results)) {
irrecv.resume(); // Prepare for the next value
// resultToRawArray() allocates the memory we need for the array.
raw_data = results.rawbuf;
// Find out how many elements are in the array.
size_of_rawdata = results.rawlen;
CLEAR_TO_SEND = true;
}
if (IRLED_SEND_SWITCH){
if (CLEAR_TO_SEND){
irsend.sendRaw(raw_data, size_of_rawdata, 38); // Send a raw data capture at 38kHz.
delay(1000);
}
else {
IRLED_SEND_SWITCH = false;
}
}
int16_t light = analogRead(cdsPin);
int16_t brightness = map(light / 2, 0, 1024, 255, 0);
int16_t buttonValue = analogRead(buttonPin);
if(buttonValue == 339) {
IRLED_SEND_SWITCH = !IRLED_SEND_SWITCH;
}
if(buttonValue == 682) {
IsRfidWriteMode = !IsRfidWriteMode;
}
if(buttonValue == 900) {
rfid_rw(IsRfidWriteMode);
}
if (IRLED_SEND_SWITCH){
IRDisplayStr = 'S';
neo_color_index = 5;
} else{
IRDisplayStr = 'P';
neo_color_index = 0; //normal
}
if(IsRfidWriteMode){
RFIDDisplayStr = 'W';
neo_color_index = 6;
} else {
RFIDDisplayStr = 'R';
}
neoPixel.setPixelColor(1, neoPixel.Color(neo_color[neo_color_index][0],neo_color[neo_color_index][1],neo_color[neo_color_index][2]));
u8g2.setFont(u8g2_font_ncenB08_tr);
u8g2.setFontPosTop();
u8g2.setFontDirection(0);
u8g2.firstPage();
do{
temp = dht.readTemperature();
humi = dht.readHumidity();
if (pms.read(data)) {
if ((int) data.PM_AE_UG_2_5 < 9) {
pm25_status = 1;
}
else if (8 < (int) data.PM_AE_UG_2_5 && (int) data.PM_AE_UG_2_5 < 26) {
pm25_status = 2;
}
else if (25 < (int) data.PM_AE_UG_2_5 && (int) data.PM_AE_UG_2_5 < 76) {
pm25_status = 3;
}
else if (75 < (int) data.PM_AE_UG_2_5) {
pm25_status = 4;
}
if ((int) data.PM_AE_UG_10_0 < 16) {
pm100_status = 1;
}
else if (15 < (int) data.PM_AE_UG_10_0 && (int) data.PM_AE_UG_10_0 < 51) {
pm100_status = 2;
}
else if (50 < (int) data.PM_AE_UG_10_0 && (int) data.PM_AE_UG_10_0 < 150) {
pm100_status = 3;
}
else if (149 < (int) data.PM_AE_UG_10_0) {
pm100_status = 4;
}
}
neoPixel.setBrightness(brightness);
byte neo_status = max(pm25_status, pm100_status);
neoPixel.setPixelColor(0, neoPixel.Color(neo_color[neo_status][0],neo_color[neo_status][1],neo_color[neo_status][2]));
neoPixel.show();
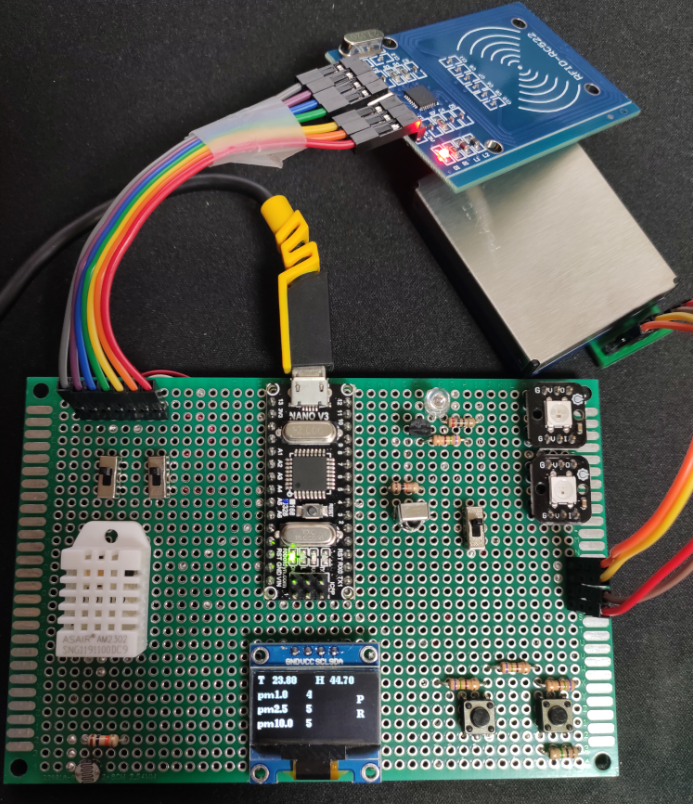
u8g2.setCursor(0, 0);
u8g2.print(F("T"));
u8g2.setCursor(16, 0);
u8g2.print(temp);
u8g2.setCursor(64, 0);
u8g2.print(F("H"));
u8g2.setCursor(80, 0);
u8g2.print(humi);
u8g2.setCursor(0, 15);
u8g2.print(F("pm1.0"));
u8g2.setCursor(0, 30);
u8g2.print(F("pm2.5"));
u8g2.setCursor(0, 45);
u8g2.print(F("pm10.0"));
u8g2.setCursor(54, 15);
u8g2.print(data.PM_AE_UG_1_0);
u8g2.setCursor(54, 30);
u8g2.print(data.PM_AE_UG_2_5);
u8g2.setCursor(54, 45);
u8g2.print(data.PM_AE_UG_10_0);
u8g2.setCursor(110, 20);
u8g2.print((String)IRDisplayStr);
u8g2.setCursor(110, 35);
u8g2.print((String)RFIDDisplayStr);
}while(u8g2.nextPage());
}
//==================== end loop func ====================